Part 1 - Baseline OctoShop Pipeline
In this lab we'll build a basic "OctoShop" Pipeline that relies on 3 Generative AI models: CLIP Interrogator, Llama 2, SDXL.
We'll use 3 model containers serving inferences on 3 endpoints that are hosted on OctoAI compute services. OctoAI compute services lets you build, deploy and scale GenAI-powered applications in production.
Out of those 3 model containers you'll learn how to build the SDXL container from scratch using Docker, and launch it yourself on an OctoAI endpoint.
In Lab 2, we'll modify the container to use ControlNets, and add AI-based face swapping in order to ensure face preservation.
Pre-Requisites
Please make sure to go through the pre-requisites before proceeding further.
Section 1: Build the SDXL model container
We assume you've already cloned the dockercon23-octoai repository. Make the sdxl directory your working directory.
cd ~/dockercon23-octoai/lab1/sdxl
Inside of this directory, there are several files:
Dockerfile- Dockerfile used to build the SDXL model container.requirements.txt- file containing the pip packages that we're dependent upon.server.py- inference server scaffold built with sanic.model.py- model file that contains the model definition.download.py- file to download weights onto the model container at build time.
Build the container with the following command
docker build -t sdxl --progress plain .
The build process will take about 20mins. We've incorporated a break in our schedule to take advantage of the build time.
Check that the sdxl image was built successfully with the following command
docker image ls
You'll see something like this
REPOSITORY                                    TAG                                    IMAGE ID       CREATED         SIZE
sdxl                                          latest                                 9ab84915367b   2 minutes ago   26.4GB
Section 2: Run the model container
Let's go ahead an run a new container out of the newly built sdxl image.
A few explanations on the command we're about to run
docker run sdxlwill runs a new docker container from thesdxlimage locally-druns the container in background and prints container ID--rmautomatically removes the container when it exits-p 8080:8080publishes the container's port 8080 to the host port 8080--gpus allallows you to access NVIDIA GPU resources--name sdxlassigns the namesdxlto the container
docker run -d --rm -p 8080:8080 \
        --gpus all \
        --name sdxl sdxl
Now that this container is running locally, double check that it is running
docker container ls
You'll see something like this
CONTAINER ID   IMAGE        COMMAND                  CREATED         STATUS         PORTS                                       NAMES
f53e442f7351   sdxl      "/opt/nvidia/nvidia_…"   2 minutes ago   Up 2 minutes   0.0.0.0:8080->8080/tcp, :::8080->8080/tcp   sdxl
You can dump the logs with the following command while the container is running
docker logs sdxl
You'll see the following log from when the model is being initialized inside of the Docker container. Keep periodically running docker logs sdxl until we see "SDXL pipeline has been initialized!" in the logs.
Initializing SDXL pipeline...
Loading pipeline components...: 100%|██████████| 7/7 [00:02<00:00,  2.45it/s]
SDXL pipeline has been initialized!
[2023-09-24 20:40:28 +0000] [50] [INFO] Starting worker [50]
That means the model container is ready to serve inference requests! It'll be listening at the following URL for incoming inference requests: http://localhost:8080/predict.
Section 3: Test, deploy, and integrate the model container into an OctoShop pipeline
Time to switch to an iPython Notebook to test out the SDXL model container you've just launched!
We'll be launching the jupyter notebook from the AWS instance, since we need to be able to interface with the docker container we just launched on that instance.
cd ~/dockercon23-octoai/lab1
jupyter notebook --no-browser --port=8888
Your AWS dev instance will launch the notebook server and produce the following log. Note the URLs that is provided in the log (your token will be unique and from the one below different, so we put in a place holder):
    Or copy and paste one of these URLs:
        http://localhost:8888/tree?token=735c08fd361cc0fae396aba2a68667b93657d6798a2e2a76
Then on your laptop browser paste the URL with your own token (provided by Jupyter Notebook server). This assumes you've set up port forwarding between the AWS instance and your laptop as indicated in the "SSH into your instance" of the pre-requisites.
Note: your token will certainly be very different from the one below so make sure to use your own token!
http://localhost:8888/tree?token=735c08fd361cc0fae396aba2a68667b93657d6798a2e2a76
The rest of the instructions for section 3 will be embedded in the lab 1 iPython notebook.
Section 4: Stop the Jupyter notebook, and your SDXL docker container
When you're done with Section 3:
-
You can kill the Jupyter notebook server by hitting
Ctrl+Cfrom the remote session that had launched the jupyter notebook session. -
You can go ahead and stop the
sdxlcontainer that you've been running with the following command on the AWS dev instance.
docker stop sdxl
Section 5: Set Up the Discord Bot Account
We're going to configure a Discord Bot. In your laptop browser:
-
Create a Discord application
- Go to Discord applications.
- Click "New Application" at the top right.
- Provide a name for your application, following the convention:
<dockercon23-lastname-firstname>agree to terms of service, and then hit "Create".
-
Create an application token
- Once you are in your application's page, click on "Bot" in the sidebar and then hit "Reset Token".
- This will give us a token string that we need for our bot.
- Please, save the token string because you can only see it once, and we'll need it later to deploy our Discord bot!
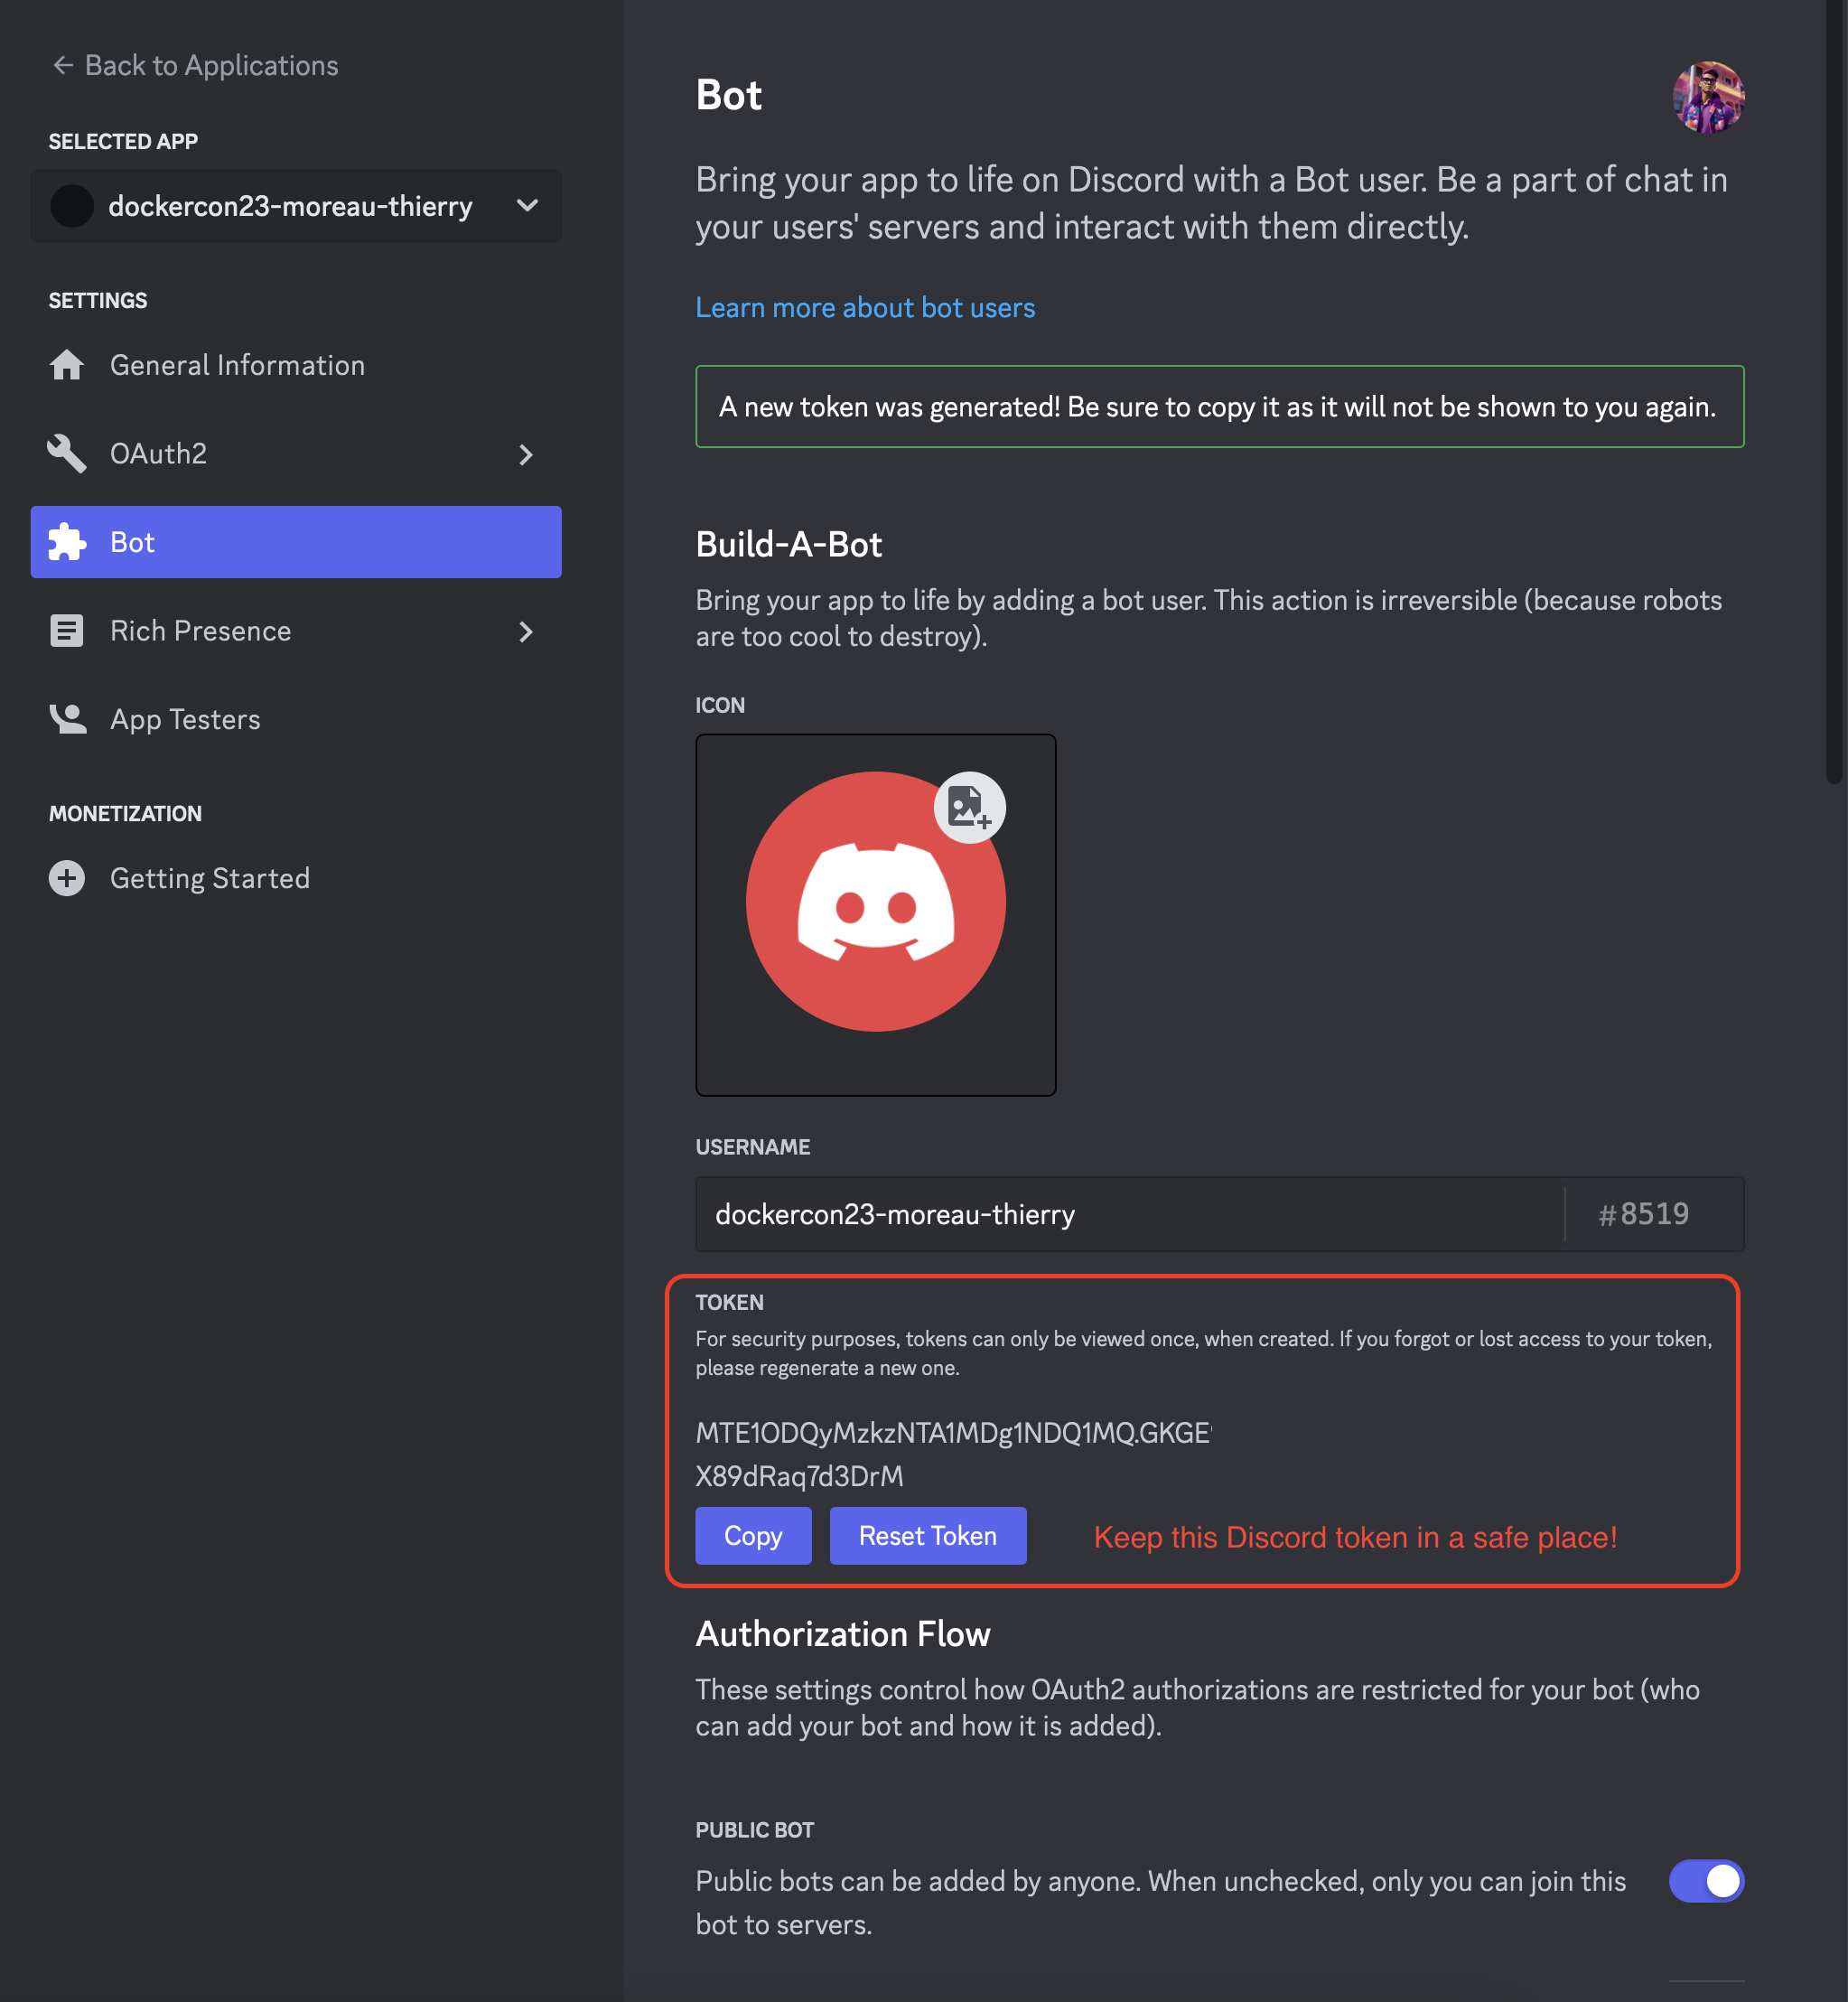
- In the "Bot" section, enable "Message Content Intent" in the "Bot".
- From this edit, you'll have unsaved changes, so make sure to save the changes by hitting the green "Save Changes" button.
- Once you are in your application's page, click on "Bot" in the sidebar and then hit "Reset Token".
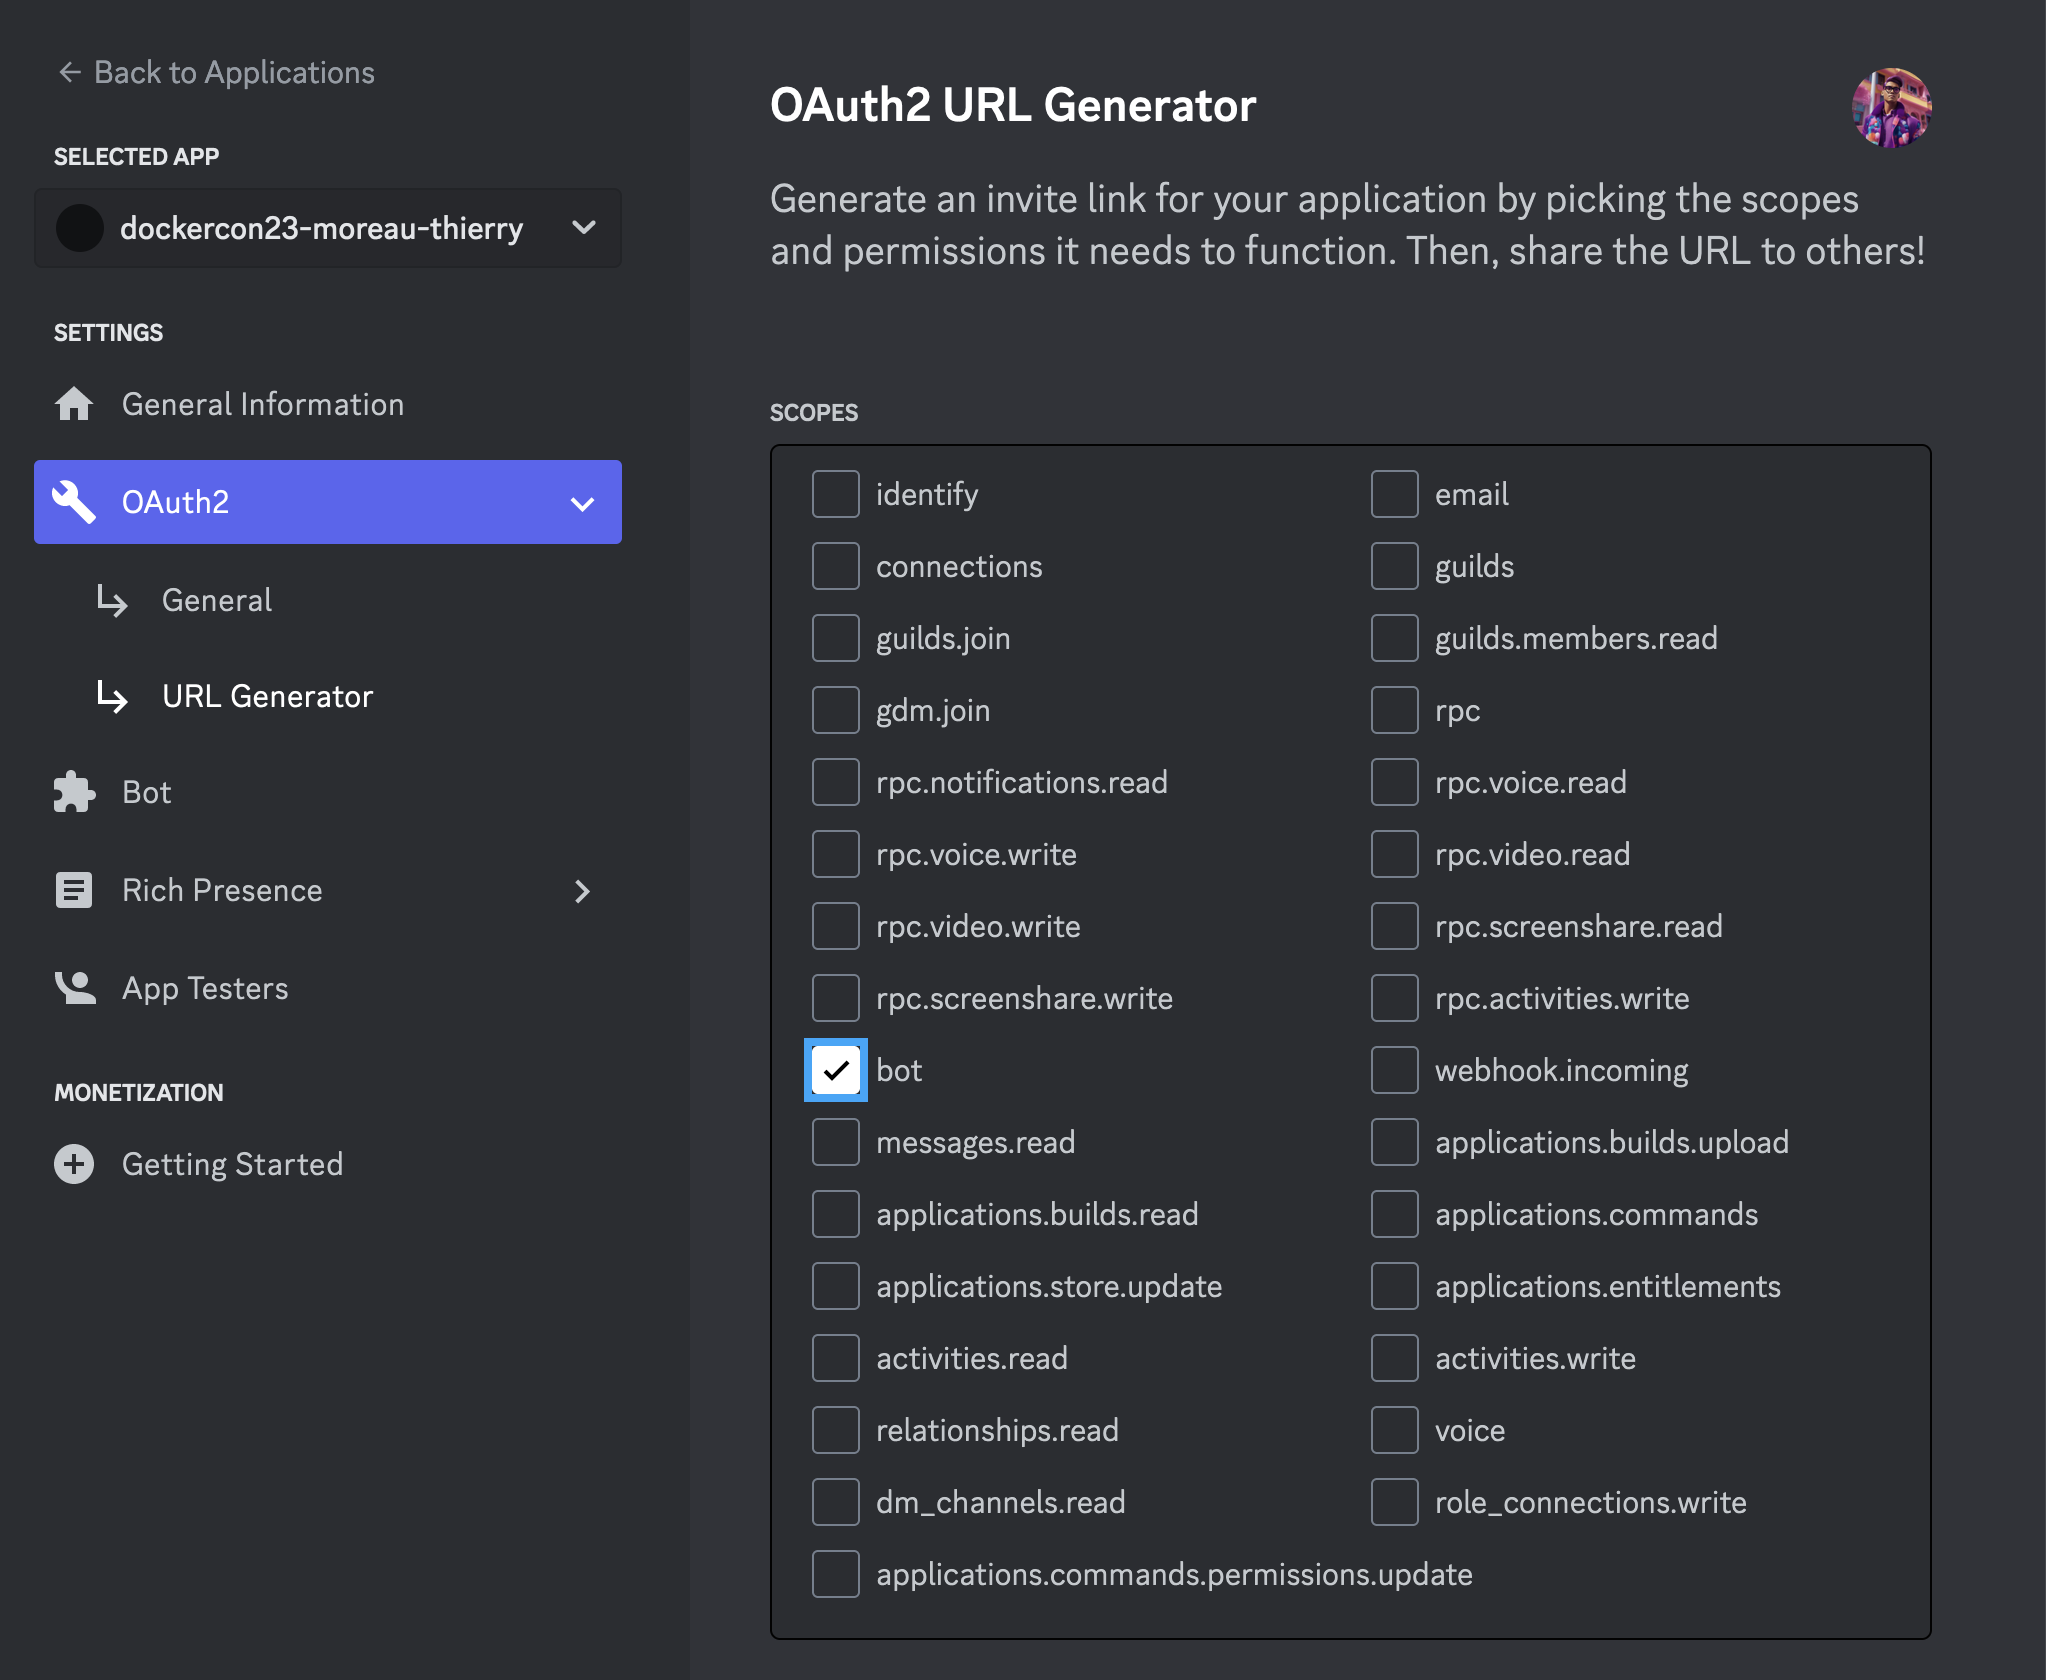
- Create an invitation url
- Now on the left menu, under settings for the new app, click on "OAuth2", and then "URL Generator"
- In scopes, select "bot".
- Then, in bot permission, select the following:
- "Send Messages"
- "Attach Files"
- "Use Slash Commands"
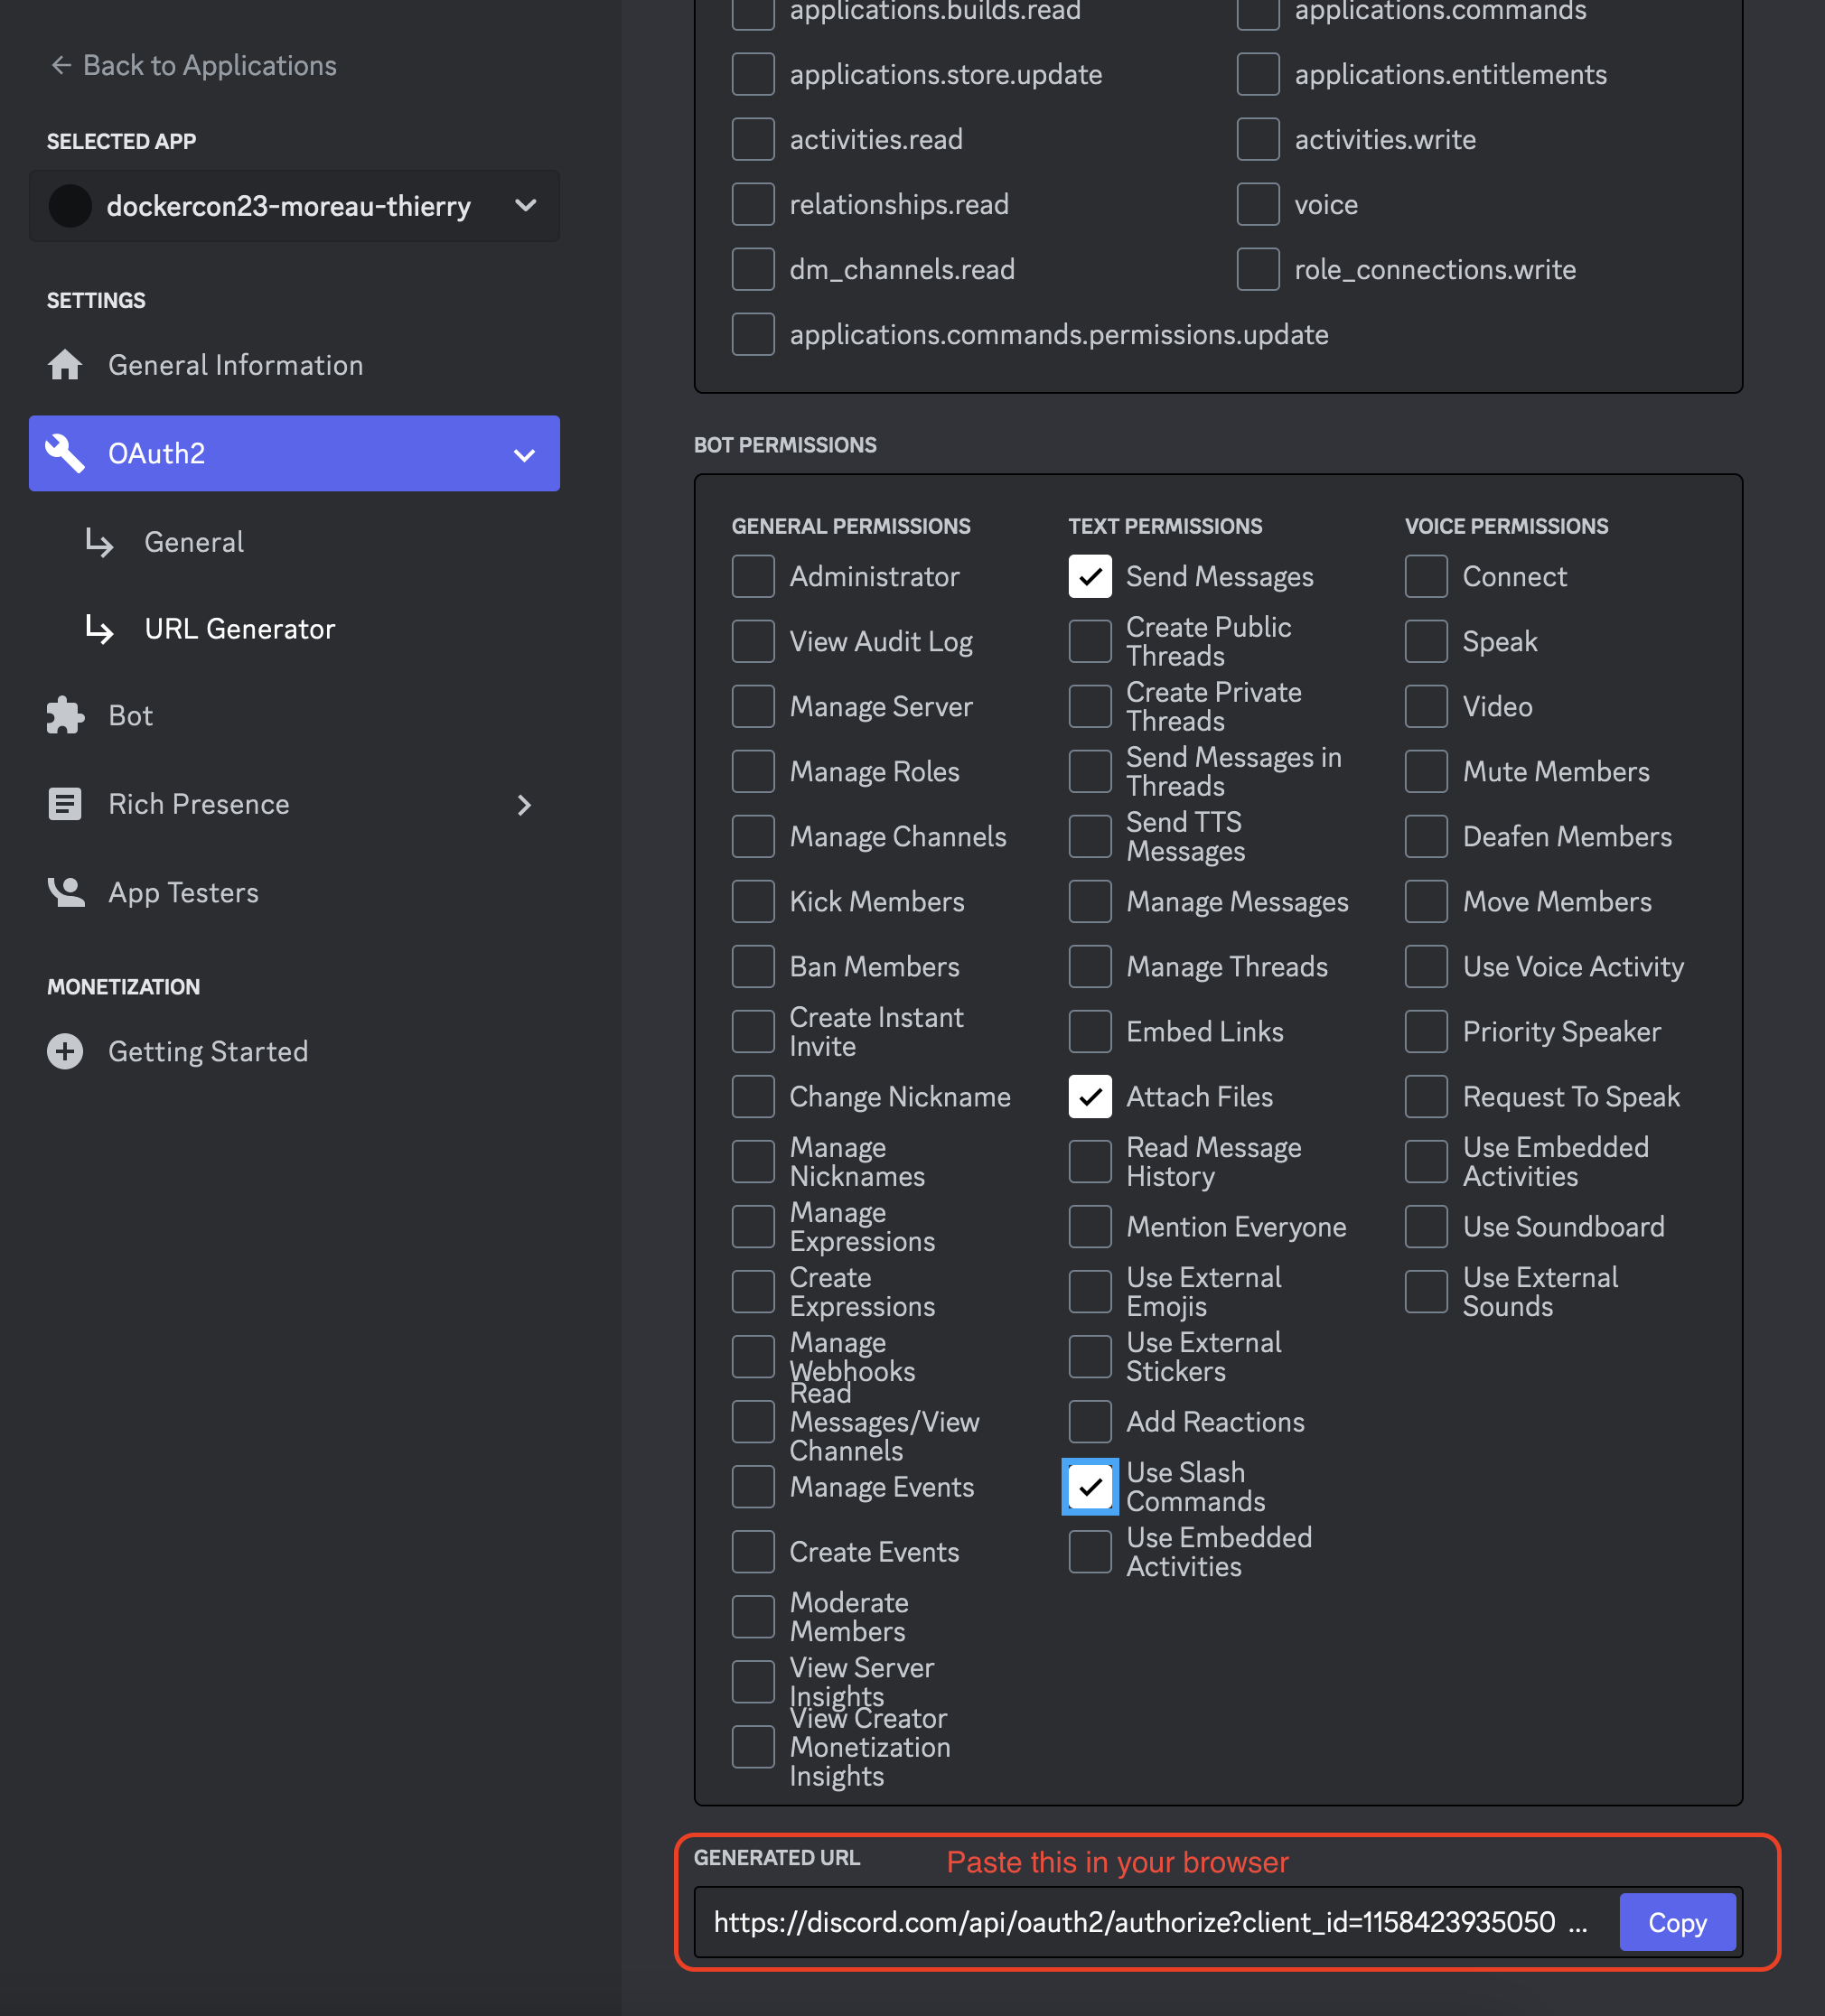
- Copy the "Generated URL" down below:
- Notice the red rectangle highlighted in the image above with the generated URL. Add it to the following spreadsheet under the
Your Discord Bot URLcolumn so our Discord admin can enable your bot in the#dockercon23-botchannel. Also add the bot name that followed the<dockercon23-lastname-firstname>convention under theDiscord Bot Namecolumn. - Wait until in the spreadsheet, the
Discord Bot Statuscorresponding to your row is set to ACCEPTED. Then proceed to the next section. Meanwhile, we invite you to start Lab 2...
- Notice the red rectangle highlighted in the image above with the generated URL. Add it to the following spreadsheet under the
Section 6: Build and run your discord bot
On your AWS dev instance, go to discordbot folder
cd ~/dockercon23-octoai/lab1/discordbot
Personalize your discord bot by overwriting the following lines in workflow.py, under the octoshop_workflow() function definition.
user_prompt = "set in outer space"

user_style = {
    "name": "sai-digital art",
    "prompt": "concept art {prompt} . digital artwork, illustrative, painterly, matte painting, highly detailed",
    "negative_prompt": "photo, photorealistic, realism, ugly",
}
Build the discord bot container
docker build -t bot .
Run container with three variables below. YOUR_COMMAND_NAME is the name of the bot command you will use in the discord server.
* Name it to whatever you want! As long as it's unique (i.e. doesn't alias with the other contestants). For instance for this bot that puts photos into space, I may want to call my command spaceify. I'll therefore be able to invoke the bot on Discord using the /spacify command.
* This can be edited right before running the container and it doesn't require any modification in your bot account.
* Once you've settled on a bot name, please update the workshop attendee spreadsheet under the Discord Bot Cmd column.
docker run --rm -it \
-e DISCORD_TOKEN=YOUR_DISCORD_TOKEN \
-e DISCORD_COMMAND=YOUR_COMMAND_NAME \
-e SDXL_ENDPOINT_URL=YOUR_SDXL_OCTOAI_ENDPOINT_URL \
bot
Now that the container is running on your AWS dev instance, test out your bot! Note that your bot will be functional as long as the bot container is running on the AWS instance. This means your bot will be functional for the workshop and likely not beyond the day of the workshop.
See the kinds of amazing images your bot produces, powered by OctoAI endpoints in the backend.
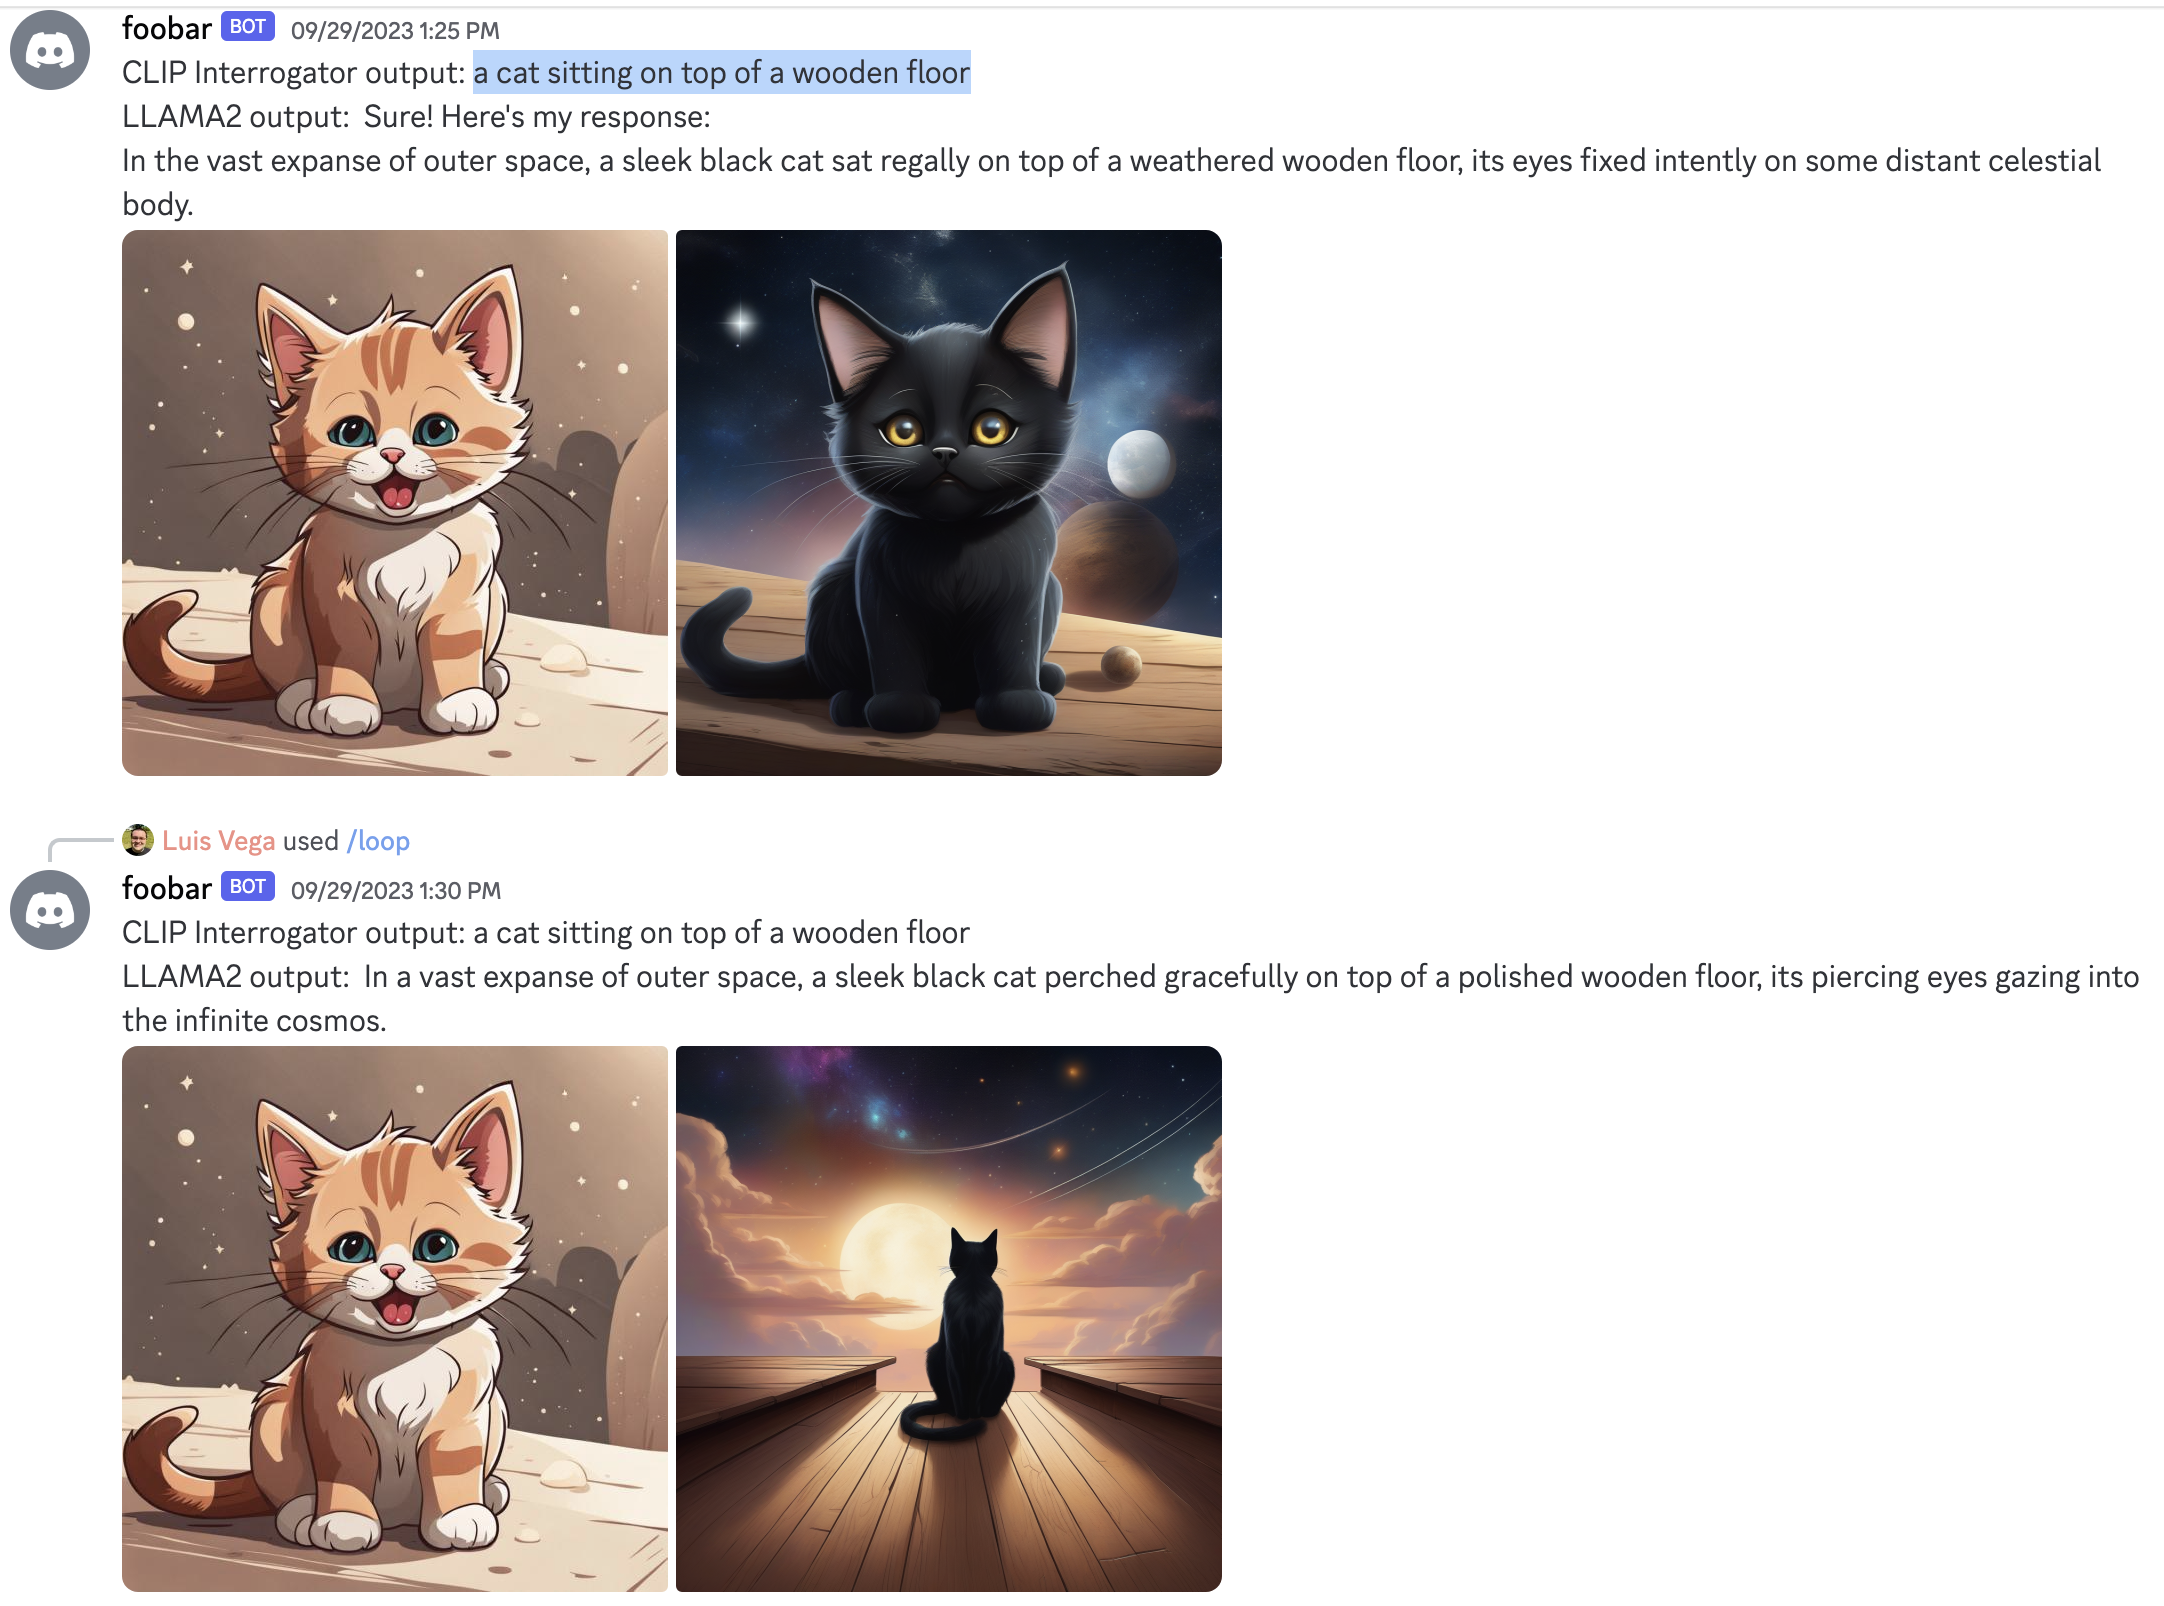
You'll notice that no matter how you try to adjust the style or the prompt, the input and output images are not quite consistent. In Lab 2, we'll learn how to address that with the use of ControlNet.
When you're done running your bot, you can kill the bot container with Ctrl+C. This will cause the bot to stop functioning.
Section 7: Pause your OctoAI SDXL endpoint
When you don't need to use your OctoAI SDXL endpoint, you can go to the Info view of the SDXL endpoint and simply hit Pause endpoint button to pause the endpoint.
While the endpoint is paused you won't be billed for usage.